Monday, November 23, 2015

Kristen & Mela.

It's been too long since I've seen Kristen. Almost 5 years, I think. The last time I saw her daughter Mela, she was just a tiny little cub crawling around. This time we had to pull her out of school [she got to study photography instead!] to take her photos. Time flies. But as dear friends do, we started right where we left off and had one fun afternoon together. And we received the most gorgeous November day EVER for photos. Win/win.


Tuesday, March 31, 2015

A first for shirts.

Ok so. I am a basic sewer. I don't know all the lingo or the stitch types and I have to google how to thread my bobbin every time it runs out.  Every single time. And I tried to sew a button hole without the button hole foot. And when my mom asked if I had a button hole foot, I pretended to know what she was talking about when she said to look in the machine's storage compartment. But I grew up always having homemade halloween costumes, flower girl dresses, Christmas PJs, sweaters, quilts, etc. And even though making basic clothes isn't a necessity for us [as long as I can buy a new onesie or shirt on clearance at Carter's for $3!], it is a talent and past time that I want to continue to pass onto my kids. Plus, it's fun to make something that's one-of-a-kind for their one-of-a-kind personalities and styles. But because I'm a novice and had crashed and burned on my first shirt attempt, I called in the big guns and sewed with my Mom's fine instruction last weekend.

The task: make a couple of cute springy tops for Meadow. Roomy enough, of course, to fit her wide belly and long enough to accommodate her long torso.

The FREE pattern: Izzy Top from Climbing the Willows [thank you!].

The fabric: Some 30% off lovelies from Joann's and remnants from Liberty of London for the bodice lining and button flap...[I may not be an expert sewer yet, but I know where the good buttery fabrics are at and will use them even if just sparingly!]

The result....


Thursday, June 26, 2014

DIY | A sign for sleep

Our baby doesn't have a crib yet. She's due in less than two weeks. Meh. She has a moon-shaped cradle [
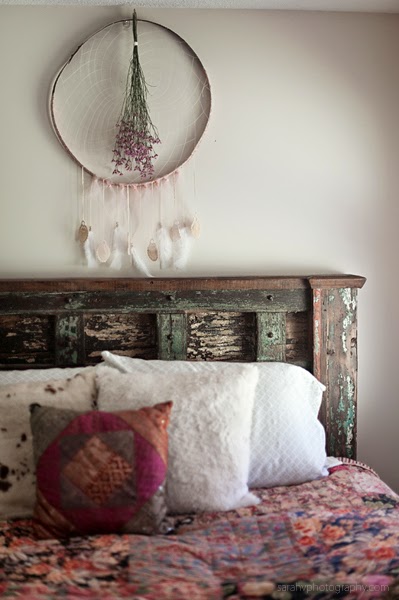
more on that later!] and a swing that plays eleven different zen lullabies. That'll do for now. But because there is no crib, I feel that revealing her entire nursery wouldn't be right. It's just not complete yet. It's missing a certain, je ne sais quoi. Not to mention the elephant in the room that is our guest bed which is the size and weight and texture of a literal elephant. Luckily it is my favorite piece of furniture in our possession and follows the country bohemian vibe of baby girl's side of the room. It also makes for a lovely photo backdrop for some of the items that will eventually be incorporated around her crib.

And speaking of beds. SLEEP. I am keeping my fingers and toes crossed that our little miss enjoys this glorious part of life as much as I do. There is no replacement for a good night's rest or even an afternoon cat nap. That whole, "I can sleep when I'm dead," saying - BOGUS. With a good night's rest, I'm more likely to fully enjoy and be prepared for the waking moments and adventures that life throws at me. Realizing that sleep is going to be a foreign word for a while once our girl arrives, I decided to make a sign for her nursery as a reminder of the importance and beauty of sleep. Pinspiration found [here].

Below is a rundown of how this thrifty and rustic sign came to be...


^ I know there are a lot of DIYs on Pinterest that repurpose wood pallets. Here's the thing. Pulling apart a pallet is not as easy as some of these Pins make it sound! There was a lot of strategic yanking and pulling and banging involved to finally get nail and crack free boards. I did it at 7 months pregnant, so it can be done, but maybe wear gloves and have a heating pad ready for your back afterwards. And a hammer and crowbar are a must. A handy guy with a power saw isn't a bad idea either...

^ I used two of the less attractive boards as support for the entire sign. Some tutorials use metal brackets. I didn't want to pay for those...because I'm cheap. Self-starting wood screws [to me, this is a screw that has a pointy tip...I'm sure Bob Villa and my Dad are shaking their heads simultaneously] were used along with our cordless drill to secure these two supports onto the back of the front boards. Make sure your screws are short enough so they don't poke through to the front. I used 3/4 inch. 

^ Another thing about wood pallets. They aren't smooth. They're quite rough actually. And the screws and nails leave uneven holes and splinters. Because of the above mentioned handy guy of mine, we own a hand sander. This is ideal for smoothing out all the splinters, stains and uneven edges. A medium grit paper will suffice. You don't want to smooth out all original dips and ridges. This step is also a must in order create a more even surface for painting. Hand sanding works too...and you'll likely have really toned arms if you go that route!

^ A clean slate. Another note of pallet repurposing - nail holes. The nail holes seen here in the middle are from the original pallet's nails. You won't get a perfectly clean hole-free board. 

^ And a pup. This is Haley. One of her favorite pastimes of late is also sleeping. She prefers a spot under the dining room table. Though, I hear that in her younger years she was quite the mountaineer. 

^ Because I didn't already have stencils and am fairly fast with freehand lettering, I chose to just use a straightedge and pencil to sketch out my letters before painting.  Not perfect, but it'll do. Halfway through this process I realized that CHALK actually works much better than pencil. So stick with chalk. It's easier to see and who doesn't love getting to write with chalk? Am I right?? 

^ Our local hardware store was phasing out this Benjamin Moore Affinity paint so their samples were only $1 each as opposed to $6! Winning. This little bit was all I needed for this project. I bought the smallest sponge brush they had, but in reality I ended up using a very thin square watercolor brush for a bit more precision. And I already had it in my stash of brushes. Don't forget to wash your brushes directly after use! 

^ As stated above, pencil is hard to see. Exhibit A. But generally, this is how I accomplished the lettering - just some rough free hand lettering filled in with one solid coat of white paint. 

^ Almost done! The mountains were done free hand also. The lavender mountains were painted first and sanded down a bit using the 150 Grit sand paper. I wanted them to fade in the background and show some of the wood texture. 

^ Because this next step involved a very pungent odor, I chose to work in our open, well-ventilated garage and set the sign on two saw horses. 

^ Said pungent smell came from the polyurethane. Not only is the fume strong...but it will not come out of your down jacket if you happen to splatter it on it. Fact. I chose a clear satin poly. I think it is a happy medium finish for this project. 

^ As expected, the poly did slightly darken and bring out the details of the natural wood but did not change the color or color depth of the paint. Above left shows half of the sign with poly and half without. Above right shows how the partially sanded lavender mountains gained some texture after a coat of poly. J'adore how this turned out. I used two coats of poly. The wood just drank in the first coat so a second coat was necessary for a solid finish. 

^ Tada! Words to live by baby girl, words to live by. 


I used a sawtooth picture hanger on each of the supporting back boards to hang this. It is fairly heavy so requires this type of hanger.


Thursday, June 19, 2014

Dream big, little one.

Miley Cyrus has a dream catcher tattoo. This sort of taints the harmony of a dream catcher, no? Yes. But, I'm going to try to look past this fact and stick with the origin of the dream catcher and how lovely it's symbolism is. 

The short version, the dream catcher originated from a Native-American Ojibwe story about a spider woman [also going to look past any creepy crawly connotations of a spider] who watched over the children and the land of her people. But as these people spread throughout the land, she could no longer cover their vast territory. In response, people would create the web-like charms to mimic her spirit of watchfulness, hanging them above the cradles and beds of infants and children to filter all bad dreams and nightmares. The bad dreams are trapped in the web and disappear at daylight. The good dreams flow down through the feathers onto the sleeper. How sweet! 

I am not very superstitious [at all] but whether you believe in the Native-American spider woman or God above, the symbol can be applied. Plus, like so many other boho and new-age style lovers out there, I think the dream catcher is just so...dreamy! Here's a look at the dream catcher I made for baby girl's nursery...


What I used: 
Hoop | An 20" rusted metal hoop found while cutting down our Christmas tree in Colorado! FREE. 
Hoop Wrap | Liberty floral fabric from my stash. An oldie but a goodie. 
Web Cordage | Off-white crochet yarn. A 50 cent purchase from a local antique shop. 
Feathers | White feathers from AC Moore [$1.99]. Antique crochet curtain pulls [$6]. Wooden beads [$3.99]. Crochet yarn [50 cents]. 
* Dried Center Flowers | Not part of the original dream catcher design, but a nice touch [$4]. 


Friday, June 13, 2014

quilty as charged.

HELLO!

Winter is generally a slower season for me, but slow is an understatement of this winter's progression. It crawled. Like a backwards snail. Covered in molasses. In winter! It was a slow start and a time of settling in and getting acquainted with our new home town and life in Vermont.

This time also included a small hiatus for my Mac out of my hands and into Mike's for his construction work. I had withdrawals. But I am glad to announce that he has his own Mac now! I thank his persistence and his boss for this. So now that the sluggish north country winter is over and I finally have my beloved Mac back, I can move onto and share some fun projects that are in the works! Yippy skippy!

This project share is still in it's middle stages of completion. And it is something that I've only helped supply some inspiration for, but cannot take any credit for. My mom gets all the kudos for the expertise and perfect craftsmanship that has gone into it thus far. She is what I would consider the master of all quilters. Queen of quilts. She beautifully combines her artistic eye for color and pattern with her knowledge of textiles and tools with her precise geometric and logistical planning. Luckily for me and our baby girl, she is focusing all that amazing energy into a quilt for her grand baby #2 [#1 is not mine...you can meet her here!].

So first things first, after much pinning and perusing, I found a few pinspirations [see my thought process here!] for baby girl's quilt-to-be.

I wanted boho.
And country.
And a nod to the outdoors.
And color. Lots of color. Not a lot of white.

The photo below [left] was my favorite color scheme. So my mom and I met in April to literally dissect the Portsmouth Fabric Company in downtown Portsmouth, NH to find the perfect combination of fabrics to tell this color story through an eclectic collection of fabrics. Success. The fabrics we found mixed with some of my mom's Liberty of London scraps have created the look I was going for. The photo below [right] is the stack of quilted blocks so far. They are TREES! My nod to the outdoors.


There is a lot more to go into this project and I cannot wait to see it all come together. 

Some details: 
* There will be fifty trees. FIFTY!
* Each fabric is only used to make two trees. 
* Some of these fabrics had to be fussy cut...a term I picked up in April. Literally, a fussy and deliberate way to cut fabric so that you get the right part of the pattern in the trees. This ensures that there are no headless woodland creatures or interrupted and wonky looking blooms. 
* The trees and background are machine pieced out of tricky trapezoids and triangles.
* The trunk of each tree was pulled from one Japanese fabric. It was perfect. And the only piece left! 

Details not seen here: 
* The back...well...wait for it. It's amazing. 
* A boarder? Why yes! A whimsical very pale lavender with small white polka dots. This is a quilt for a little lady, after all. 
* An edge binding? None other than Liberty of London's Strawberry Theif. A family fabric favorite. 
* Quilting. My favorite part. The part of every quilt that holds it together like steel and hugs in the fabrics to create that soft already-loved look. This is hand done by Mom. Her hand quilting is out of this world. 

Baby girl's quilt is in blocks right now and still awaiting the rest of the fifty. Here are a few images I took while playing with layout options this morning. 


And since I bet no one can stand the anticipation of how this will come together, I'll give you a look at one of Mom's finished pieces. Grand baby #1 [little lady Cordelia's] star and pinwheel quilt. 


XO. 


Monday, March 3, 2014

Cordelia :: I'm New Here [Vermont Family Photography]

I'll say it again. Newborn photography is an art that I've only dipped my toe into. It's a serious talent. A test of both photographer's and parents' patience and anxiety levels. And while I may never be solely committed [see also: brave] enough to learn the art of Houdini esque baby swaddling and teetering baby head placement, my recent exposure to a close family and friend baby boom has been enough for me to get acquainted with the swoon factor of having a new life in front of my camera, staring back at my lens like a little baby deer. 

And this baby boom and my recent arrival at swoonsville has happened at a very opportune time. WINTER. Ice cold, let your truck heat for 30 minutes, lens fogging, not enough propane in the north east kingdom or your tank to heat your baby toe, polar-vortex winter. So perfectly and luckily, one said baby of the winter baby boom, was born to my twin sister in sunny and warm Scottsdale Arizona!

Miss Cordelia Katharine was born on January 27th to Kate and Brett, one week early and now one month new. A petite power house. A gem of a little lady. A sweet and hilarious little peanut. Love.